I can’t believe I haven’t shared these Pumpkin Bars with you guys already. I really thought I did. Anyway, I told my son I might try to make these for him today since it had been so long, and I got a “mom, pretty pretty please make the pumpkin bars!” I forgot just how much he LOVES these things! (OK, I love them, too)
These pumpkin bars are not only yummy but they are also full of protein, good fats and lots of fiber. They make for a great snack!
We wanted to make these bars a little more portable so we cooked them in muffin tins. If you do the same, be sure to cook them for only 25-30 minutes.
As he sat there eating the pumpkin bars, he actually said “Mmmmm, I’ve got 7 more to go”. While he didn’t eat them all, well in one sitting, this snack really is his ALL time favorite!!
My friend and co-worker Stephanie Finn took this picture recently of her favorite pregnancy snack, even though she had the baby last spring. I think she still likes them….
My husband and I are taking a 5 day trip with some of our besties soon. YAY! Happy 40th Jenn!! Anyway, since we will be somewhere pretty remote I want to be sure I bring some good healthy food. Of course, I plan to bring some my regular travel snacks (post here) and of course my purposeful snack which goes with me everywhere. However, I really wanted to bring lots of good protein. I saw some grass-fed beef jerky at Publix the other day. I was actually so excited that they had it that I almost bought it. But then I realized it was $7.50 for 2 oz of meat. I think I was buying it more for support and approval than anything else (keep selling healthy stuff Publix!). But really, I can eat 2 oz. of meat in about 2 seconds.
So then I searched high and low for good protein bars. I really wanted some that had a good source of protein. I also wanted some that were casein free (so no whey protein). Quest bars are great if you can do dairy, but I can’t. Kind bars (with only 5 grams of sugar) would have been great but no almonds for me because I’m taking a break. And the Epic bar that looks like brains (though I hear they are decent!), but $2.75 for 1.5 ounces seemed too pricey.
I just couldn’t come up with any good options. Then it hit me…I’ll make my beef jerky!! I totally forgot that I use to make beef jerky and it’s super easy! So $30 later, I’ve got 24 oz. (versus the 8 or so oz. I would have gotten for the same price from the Publix) of grass-fed beef jerky that will be perfect for my trip. Guys, this is CRAZY easy to make. The hardest part is cutting the London broil (you need a really lean meat) into thin slices. But, if you freeze the meat for an hour or two, it is actually really easy to cut. Or actually, an even easier way to cut it…is to grin and ask nicely the sweet folks behind the meat counter at Whole Foods. They’re always happy to cut itinto jerky-sized slices. I love my WF!
Whether you’re going somewhere for fall break or not, this makes for a great snack!! Happy fall y’all!
1 cup gluten free tamari soy sauce or coconut aminos
2 tbsp raw honey or coconut palm sugar
2 tsp onion powder
1 tsp garlic powder
1 tsp sea salt
Instructions
Place the meat in the freezer for 1 to 2 hours to make it easier to slice. Remove from freezer and trim any visible fat. Then slice is AGAINST the grain into thin strips about ¼ inch thick.
In a plastic freezer sized bag, combine all of the ingredients and let it marinate for at least 4 hours or overnight.
Preheat the oven to 170 degrees if you aren’t using a dehydrator. On a wire rack or parchment paper on the baking sheet, lay the meat out flat, but be sure it is not touching or overlapping.
Cook for 4-6 hours (depending on thickness) until the desired texture is reached. Flip the meat once or twice while cooking. If using a dehydrator, allow it to dehydrate for 4-5 hours.
Store the jerky in the fridge or freezer but it is fine to keep it at room temperature for a couple of days.
Fajitas have replaced our Taco Tuesdays and what a great change it has been. They have become a new weekly staple for us!!
We LOVE us some Bartaco. It is by far my daughter’s favorite restaurant. She really likes the simple chicken, cheese and corn tortilla tacos. She said she wishes we could “go all the time” but then I thought, I can do that. And you know what? I can do it, and even better. Not to boast, even though I just did, but really, these fajitas are really delicious, and they are so quick and easy to make!
Here is what you need:
1.5 lb chicken, cut into small bite sized pieces
Gluten free corn tortillas
1 green bell pepper (or a pack of pre-cut peppers)
1 small onion, chopped (or pre-cut if you can find them)
3 tablespoons unsalted Kerrygold butter or ghee
juice from 1 lime
1 garlic clove, finely minced or 1/2 tsp garlic powder
1 tsp chili powder
1⁄2 tsp cumin
1⁄2 tsp pepper
1 1/2 tsp sea salt
Having the chicken pre-cut is such a mental hurdle, and finding pre-cut sweet or green peppers too (if you can find them) is super helpful.
Warning: This part is not paleo but it is kid-friendly and gluten free. My daughter and husband like Applegate’s white cheddar cheese which is what Bartaco uses (at least they use a white cheese). I don’t use the cheese and neither does my son. We both like ours with guacamole or chunks of avocado. Tate also likes his with Pete’s Hot Sauce, but whatever. We also use corn tortillas from Whole Foods. I’m sure you can get them just about anywhere though. Everyone uses the corn tortillas and I typically just make a chicken and guacamole bowl for myself but tonight I had one with a tortilla and, man, was it good!!
In a large pan, add 1 tbsp of butter and onions and peppers. Over medium heat, stir until cooked evenly. Once brown, set aside. Add the other 2 tablespoons of butter to your warm pan and add the chicken. Cook for about 10-15 minutes or until no longer pink in the middle. Then add the peppers and onions back in with the chicken, add your spices and lime juice and mix together.
Here is our fajita meat with the pre-cut sweet peppers…
And here it is without the pre-cut peppers from last week. It really wasn’t hard and it didn’t take that long to slice, but again, mental hurdles are big….
Then use either a big flat pan or put your tortilla on the stove top burner, very carefully. Turn as it starts to brown and the cheese melts, if you use cheese, but regardless please be careful!!
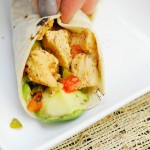
They really do turn crispy and brown when you lay them directly over the fire. See, just like the restaurants…
Place your chicken, guacamole and any other condiments you want to use in your fajitas and devour!!
This girl is happy! She had FIVE the first time I made them. Where she put them I have no idea…
1 green bell pepper (or a pack of pre-cut peppers)
1 small onion, chopped (or pre-cut if you can find them)
3 tbsp unsalted Kerrygold butter or ghee
1 lime, juiced
1 garlic clove, finely minced OR 1/2 tsp garlic powder
1 tsp chili powder
1⁄2 tsp cumin
1⁄2 tsp black pepper
1 1/2 tsp salt
Cheese
Avocados
Instructions
In a large pan, add 1 tbsp of butter and your onions and peppers. Stir them and once they are brown, set them aside. Add the other 2 tablespoons of butter to your warm pan and add the chicken. Cook for about 10-15 minutes or until no longer pink in the middle. Then add the peppers and onions back in with the chicken, add your spices and lime juice and mix together. Then use either a big flat pan or put your tortilla on the stove top burner, very carefully. Turn as it starts to brown and the cheese melts, if you use cheese. Place your chicken, guacamole and any other condiments you want to use in your fajitas and devour!!
Notes
You may want less or more salt and chili powder. Add half and taste and then adjust to your preference.
The other day my daughter said, “Mom, I can make my own lunches from now on!” Umm, did I hear that right? Music to my ears! Oh the excitement of starting back to school. But I’m no overly optimistic fool, we will see just how long that lasts….
So this is what she packed for her first day of school….
So, want to know one of the most important things I’ve learned about having a successful kids’ lunches, and in particular a healthy kid’s lunch? It’s that a lot of VARIETY can make all of the difference. It can actually make lunches fun!! Don’t give them a bag of carrots. Heck, I don’t want a bag of carrots. But if you give them three or four carrots, and a few olives, and some granola and some dark chocolate almonds…and well, lots of little surprises in their lunch, chances are greater they will eat it. Here are just a few examples of the lunches we make:
And as for the treats, remember, it doesn’t have to be perfect or even perfectly healthy, it just has to be better than some of the other cookies and treats out there.
For a more detailed list on some lunch/snack ideas, come to my office (Atlanta Center Holistic Integrative Medicine in Brookhaven on Dresden) this Thursday at 7:15pm. I will be hosting a FREE class about what our kids need to fuel (and develop) their brain, help them focus, and feel the best they can. Please RSVP to achim.communications@gmail.com to make sure there is availability as space is limited.
Here are the containers we use for packed lunches. The glass ones come from Costco, and the stainless bowls I found online at Lunchbots and Amazon.
Sorry for the big black stubborn blur in the background that wouldn’t budge…
Guess he just wanted to make sure I got the right angle. Thanks George….
Also thanks for the recommendation from my lovely sister-in-law, we now love these grass-fed beef sticks as a source of extra protein. Check them out from my favorite web site vitacost.com….
Hope to see y’all this Thursday at 7:15pm at 1401 Dresden Drive, Atlanta GA 30319!
Happy back-to-school, all! While summer was great with the kids, I am happy to be back on a schedule, and also back to cooking and posting. Honestly, this summer was a little crazy for us…Probably one of the more stressful times in my life. It is amazing how stress can impact one’s health. Fortunately, there are things that we can take to help our body deal with stress, relieve anxiety, improve sleep, nourish our adrenals glands, and restore wellness. There are three supplements that helped me this Summer. I hope they can help you too, should you ever need it.
1. Vitamin C – Take to 2-3,000 mg, but work your way up slowly as it can possibly cause some unpleasant stomach issues if you move up too quickly. Vitamin C is essential for adrenal function and can help your body deal with stress.
2. Rhodiola Rosea – Take one 200-300 mg capsule in the morning on an empty stomach. This can relieve anxiety, fatigue, mild depression, and it can nourish and heal your adrenal glands. It is an adaptagenic herb, which simply means it helps your body get back in balance.
3. Ashwaganda – You could take 1000-1500 mg before bed time. It also can decrease anxiety, boost immune health and improve sleep. It is also an adaptagen and can work synergistically with rhodiola, especially when you have high cortisol.
On to the food…
Mmmmm, Sundried Tomato Chicken Pesto pasta is now one of our family’s new favorite meals. While this meal takes a little longer to make than my typical, it’s so worth it. And after making it twice in less than 8 days, both times I actually got a “YAY!!” and “Mom, I love this meal!”. And, it’s even better leftover. I hope you guys like it as much as we do!
Happy back to school, everyone! These guys were clearly bummed to go back to school…
1 pound chicken breast, cut into bite sized pieces
4 cloves garlic, minced
1/2 tsp paprika
6 ounces sun-dried tomatoes (in olive oil), sliced thinly
1/4 cup white wine
1/4 cup chicken broth
1/2 cup canned coconut full fat milk (just the cream from the top)
1/4 cup fresh basil, chopped
salt and pepper to taste
1 cup shredded parmesan (half for in the recipe and half for garnishing)
Instructions
Start by slicing your spaghetti squash in half, scoop out the seeds, and then put both sides, face down on a cookie sheet. Cook on 400 for 20-25 minutes or until soft.
Then cut chicken into bite sized pieces and put them aside.
Next, turn a large pan on high, add butter and minced garlic, and allow the garlic to brown.
Then add in the chopped sundried tomatoes, the oil that is in the jar, and the chopped chicken in the pan with the garlic and butter.
Cook and turn the chicken until it starts to turn golden brown on all sides.
Add the paprika, wine, broth and cream (coconut) and bringing everything to a simmer for about 5 minutes.
Reduce the heat to medium-low, let the pan cool.
Then add the parmesan and basil and stir until the cheese melts, about 5-7 minutes or until the sauce starts to thicken.
Remove from stove and serve.
Garnish with more Parmesan cheese if you would like.
Notes
Your sauce will be a little watery before you add the parmesan cheese but the cheese will thicken up the sauce. If you want to try a dairy-free version, try 1/4 cup nutritional yeast and some 1 tbsp arrowroot mixed with 1 tbsp water, then add it to the sauce.

.jpg "My Son’s Favorite Snack…Pumpkin Bars!")
.jpg "My Son’s Favorite Snack…Pumpkin Bars!")
.jpg "My Son’s Favorite Snack…Pumpkin Bars!")
.jpg "My Son’s Favorite Snack…Pumpkin Bars!")
.jpg "My perfect travel companion…")
.jpg "My perfect travel companion…")
.jpg "Chicken fajitas…")
.jpg "Chicken fajitas…")
.jpg "Chicken fajitas…")
.jpg "Chicken fajitas…")
.jpg "Chicken fajitas…")
.jpg "Chicken fajitas…")
.jpg "Chicken fajitas…")
.jpg "Chicken fajitas…")
 I hope you all like them as much as we do!
I hope you all like them as much as we do!.jpg "Chicken fajitas…")
.jpg "What’s the #1 rule for a successful kid’s packed lunch?")
.jpg "What’s the #1 rule for a successful kid’s packed lunch?")
.jpg "What’s the #1 rule for a successful kid’s packed lunch?")
.jpg "What’s the #1 rule for a successful kid’s packed lunch?")
.jpg "Stressed out?? And…creamy sun-dried tomato chicken pasta!")
.jpg "Stressed out?? And…creamy sun-dried tomato chicken pasta!")
.jpg "Stressed out?? And…creamy sun-dried tomato chicken pasta!")
.jpg "Stressed out?? And…creamy sun-dried tomato chicken pasta!")
.jpg "Stressed out?? And…creamy sun-dried tomato chicken pasta!")
.jpg "Stressed out?? And…creamy sun-dried tomato chicken pasta!")
.jpg "Stressed out?? And…creamy sun-dried tomato chicken pasta!")